

Table of Contents
ToggleFirst, Understanding the Core Science
The fundamental difference lies in the heating method. This science impacts everything.
-
The Reverse Sear uses hot, dry air from an oven or grill. This environment gently draws moisture from the steak’s surface. Consequently, this drying effect is the secret to an unbeatable, crispy crust later.
-
Sous Vide uses precise water immersion. The steak is sealed in a bag and cooked in a temperature-controlled water bath. As a result, the steak cooks in its own juices, making it incredibly moist. However, the bag prevents any moisture loss, which can hinder searing.
Therefore, the main trade-off is simple: crust vs. juiciness. But there is much more to consider.
The Maillard Reaction: The Source of Flavor
Both methods aim to achieve the Maillard reaction—the chemical process that creates the complex, savory flavors and the beautiful brown crust on your steak. This reaction occurs most efficiently at temperatures above 285°F (140°C) in a low-moisture environment.
-
Reverse Sear’s Advantage: By slowly drying the steak’s surface in the oven, the reverse sear creates the ideal pre-condition for a powerful, rapid Maillard reaction during the sear.
-
Sous Vide’s Challenge: The steak emerges from the bag wet. Any surface moisture must evaporate before the sear can begin, which can lead to steaming and a less robust crust if not properly dried.
Carryover Cooking about Reverse Sear vs Sous Vide
This is the phenomenon where the steak’s internal temperature continues to rise after it’s removed from the heat source.
-
Reverse Sear: Relies on carryover cooking. You remove the steak from the oven 10-15°F below your target final temperature. The residual heat from the outer layers continues to cook the center during the rest period and the final sear. This requires careful monitoring.
-
Sous Vide: Eliminates carryover cooking. Because the entire steak is a uniform temperature, there is no heat gradient to transfer energy. When you remove it from the bag, the cooking stops immediately. This is a key reason for its unparalleled precision.
Protein Denaturation: The Key to Tenderness
Heat causes muscle proteins to unwind (denature) and then re-coagulate, which squeezes out moisture.
-
Sous Vide’s Precision: Cooking at a precise, low temperature allows the proteins to denature more gently, resulting in less moisture being squeezed out. Enzymatic tenderizing can also occur during long cooks, further breaking down tough connective tissue.
-
Reverse Sear’s Traditional Path: The dry heat of the oven causes more aggressive protein coagulation and moisture loss. However, when done correctly at a low temperature, this loss is minimal and is offset by the superior crust development.
Equipment and Cost for Reverse Sear vs Sous Vide
Your kitchen setup and budget are important considerations.
Reverse Sear Equipment (Low Cost):
-
Oven or Grill: You already own this.
-
Cast-Iron Skillet: A one-time, affordable purchase.
-
Digital Meat Thermometer: Essential for accuracy, costs around $20-$50.
-
Total Investment: Minimal. You are likely using tools you already have.
Sous Vide Equipment (Higher Cost):
-
Sous Vide Immersion Circulator: This is the core machine. Prices range from $100 to $300.
-
Container: A large pot or plastic bin is needed.
-
Vacuum Sealer or Heavy-Duty Bags: For sealing the steak airtight.
-
Total Investment: Significant. This method requires a dedicated appliance.
Furthermore, sous vide takes up storage space. Conversely, reverse sear equipment is multi-purpose. For this reason, the reverse sear is far more accessible for beginners.
The Process: Step-by-Step Comparison
Let’s break down the time and effort required for each method.
The Reverse Sear Timeline (Active Time: 10 mins | Total Time: ~45-60 mins):
-
Preparation: First, pat the steak dry and season it. This takes two minutes.
-
Cooking: Next, place it in a low oven (275°F). Then, you wait. This phase takes 30-45 minutes of passive time. You can prepare side dishes during this period.
-
Searing: Finally, you sear the steak in a screaming hot pan for 90 seconds per side. This step is fast and active.
-
Resting: Afterwards, let it rest for 5-10 minutes.
Mastering the Reverse Sear: A Foolproof Guide
Follow these steps for a perfect reverse-seared steak every time.
What You’ll Need:
-
Thick-cut steak (1.5 to 2 inches thick), like Ribeye, Striploin, or Filet Mignon
-
Kosher salt and freshly cracked black pepper
-
Wire rack
-
Baking sheet
-
Cast iron or carbon steel skillet
-
Digital instant-read thermometer
-
High smoke-point oil (avocado, grapeseed, or clarified butter)
Step 1: Prepare and Season (The Day Before, If Possible)
Pat the steak completely dry with paper towels. Season generously with salt on all sides. For the best results, place the steak on a wire rack over a baking sheet and leave it uncovered in the refrigerator for up to 24 hours. This “dry-brining” step seasons the meat deeply and dries the surface even further for an incredible crust.
Step 2: The Low-and-Slow Oven Phase
-
Preheat your oven to a low temperature, between 225°F and 275°F (107°C – 135°C). Lower and slower is better.
-
Place the steak on the wire rack and bake sheet in the middle of the oven.
-
Insert your thermometer probe into the thickest part of the steak.
-
Cook until the internal temperature is 10-15°F below your desired doneness (e.g., 115°F for Medium-Rare). This can take 30-60 minutes depending on thickness and oven temperature.
Step 3: The Blazing Hot Sear
-
About 10 minutes before the steak is done in the oven, place your dry skillet over high heat. Get it screaming hot.
-
Add a small amount of high smoke-point oil and swirl to coat.
-
Carefully place the steak in the hot skillet. It should sizzle violently.
-
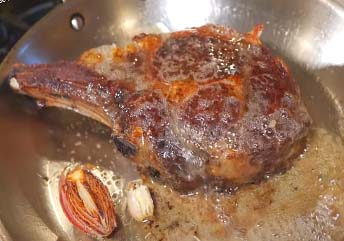
Sear for 45-90 seconds per side, including the edges, using tongs to press down for even contact. Add butter, garlic, and herbs to the pan in the last minute to baste for extra flavor.
Step 4: Rest and Serve
Transfer the steak to a clean wire rack (not a plate, to prevent the bottom from getting soggy). Let it rest for 5-10 minutes to allow the juices to redistribute before slicing and serving.
Mastering Sous Vide: A Foolproof Guide
Unlock the perfect, edge-to-edge doneness of sous vide.
What You’ll Need:
-
Thick-cut steak
-
Kosher salt and pepper
-
Sous vide immersion circulator
-
Large pot or container
-
Vacuum sealer and bags (or heavy-duty zip-top bags)
-
Tongs
-
Paper towels
-
Cast iron skillet
Step 1: Season and Seal
-
Season your steak generously with salt and pepper.
-
Place the steak in a vacuum bag or a heavy-duty zip-top bag. For the water displacement method with a zip-top bag: Slowly lower the bag into the water, allowing the pressure to push the air out, then seal the bag just before it’s fully submerged.
Step 2: The Water Bath
-
Set up your sous vide circulator on a large pot or container and fill with water.
-
Set the temperature to your exact desired final doneness:
-
Rare: 120°F – 128°F (49°C – 53°C)
-
Medium-Rare: 129°F – 134°F (54°C – 57°C) <– The sweet spot for most
-
Medium: 135°F – 144°F (57°C – 62°C)
-
-
Once the water is at temperature, submerge the bag, ensuring the steak is fully underwater. Cook for 1 to 4 hours. For a 1.5-inch steak, 1.5-2 hours is sufficient.
Step 3: The Ice Bath Chill (The Pro Tip)
This is the secret to a great crust without overcooking.
-
After cooking, remove the bag from the water bath.
-
For a better sear, plunge the sealed bag into an ice bath for 5-10 minutes. This chills the very outer layer of the steak, allowing you to sear it longer without raising the internal temperature past your target.
Step 4: Dry and Sear
-
Remove the steak from the bag and pat it intensely dry with a stack of paper towels. This is the most critical step for a good sear.
-
Follow the same searing instructions as the reverse sear (blazing hot skillet, high smoke-point oil, 45-90 seconds per side).
The Sous Vide Timeline (Active Time: 10 mins | Total Time: 1.5 – 4+ hours):
-
Preparation: First, season the steak, seal it in a bag, and preheat the water bath. This takes about 10 minutes.
-
Cooking: Next, immerse the bag in the water. The cooking time is much longer, ranging from 1 hour for a thin steak to 4 hours for a very thick one. This is entirely passive time, but it requires more planning.
-
Searing: After cooking, you must remove the steak from the bag and thoroughly dry it with paper towels. This is a critical extra step. Then, you sear it just like the reverse sear.
-
Resting: Finally, let it rest.
Crucially, sous vide offers a much wider time window. You can hold a steak at the perfect temperature for hours without overcooking it. This is ideal for dinner parties. Conversely, the reverse sear has a narrower, more immediate window.
Taste, Texture, and Final Results: The Judge’s Scorecard
This is where the methods truly diverge.
The Reverse Sear Steak:
-
Crust: 10/10. The dry surface from the oven allows for a phenomenal, fast sear. You get a deep brown, crispy crust with excellent flavor from the Maillard reaction.
-
Juiciness: 8/10. The steak is very juicy, but there is some moisture loss during the oven phase.
-
Texture: The texture is excellent and truly steak-like. It is tender but with a satisfying chew.
-
Flavor Bonus: If you use a grill or smoke the steak, you add a wonderful smoky dimension that sous vide cannot replicate.
Matching the Method to the Steak Cut
Not all steaks are created equal, and your choice of method can elevate specific cuts.
Best Cuts for Reverse Sear:
-
Ribeye: The reverse sear’s dry heat is fantastic for rendering the large fat caps and internal marbling, making it melt-in-your-mouth delicious.
-
Strip Steak (New York Strip): Benefits from the classic steakhouse texture and a powerful, flavorful crust.
-
Porterhouse/T-Bone: The reverse sear gently cooks both the strip and the filet without overcooking either, which is a challenge with direct high heat.
-
Bonus: Smoked Steak: Using a grill or smoker for the low-heat phase adds an incredible smoky flavor that sous vide cannot replicate.
Best Cuts for Sous Vide:
-
Filet Mignon (Beef Tenderloin): This lean, tender cut is all about texture and juiciness. Sous vide delivers a buttery, perfect result from edge to edge.
-
Tough, Marbled Cuts like Chuck Eye or Short Ribs: Sous vide shines with long cooks (12-48 hours) at lower temperatures, transforming these tough, inexpensive cuts into steak-like tenderness that rivals prime rib.
-
Very Thick Steaks (2+ inches): The precision of sous vide is unbeatable for ensuring a 3-inch thick tomahawk ribeye is perfectly medium-rare throughout without a gray band.
The Sous Vide Steak:
-
Crust: 7/10. Achieving a great crust is challenging. The wet surface must be dried perfectly first. Otherwise, the steak steams instead of sears.
-
Juiciness: 10/10. This is the undisputed champion of moisture. Because it’s cooked in its own juices, it is impossibly juicy and tender throughout.
-
Texture: The texture is incredibly tender, almost buttery. Some steak purists feel it can be almost too tender, lacking a classic steak bite.
-
Precision: It offers unmatched precision. You can cook a steak to exactly 131°F from edge to edge with zero guesswork.
Safety and Consistency: Which is More Foolproof?
Sous Vide is the Winner for Consistency.
The water bath provides an exact temperature. Therefore, it is almost impossible to overcook the steak within the recommended time frame. It is the ultimate “set it and forget it” method.
The Reverse Sear Requires More Attention.
You must monitor the internal temperature with a thermometer. However, with a good thermometer, it is still very reliable. The risk of error is low but present.
An Important Safety Note: Sous vide cooking requires extra care with food safety for very long cook times (over 4 hours). The reverse sear does not have this concern.
Which Method is Best for Your Specific Situation?
Use this guide to decide.
-
Choose the REVERSE SEAR if:
-
You don’t want to buy special equipment.
-
Love a thick, crispy, flavorful crust.
-
You want to cook a steak within an hour.
-
Enjoy using your grill or smoker.
-
-
Choose SOUS VIDE if:
-
You already own the machine or love kitchen gadgets.
-
Your top priority is maximum juiciness and tenderness.
-
You are cooking for a party and need timing flexibility.
-
You want absolute, guaranteed precision every time.
-
Can You Combine Both Methods?
Yes, some experts do this! You can:
-
Sous vide the steak first to get the perfect, juicy interior.
-
Then, chill the steak in an ice bath for 10-15 minutes. This step is crucial.
-
Finally, use the reverse sear method by finishing the steak in a low oven (275°F) for 15-20 minutes to warm it through, then sear it.
This method gives you the juiciness of sous vide with the superior crust of the reverse sear. However, it is the most complex approach.
Frequently Asked Questions (FAQ)
Q: Can I achieve a good crust with sous vide without an ice bath?
A: Yes, but it’s more difficult. The ice bath is a pro trick that gives you a larger searing window. Without it, you must pat the steak extremely dry and work very quickly in a ripping hot pan to avoid overcooking.
Q: Is it safe to cook steak in a plastic bag with sous vide?
A: Yes, when using bags specifically rated as food-safe and BPA-free. Look for bags designed for vacuum sealers or those labeled as safe for sous vide. These are made from polyethylene (PE) or nylon/PE laminates and are stable at cooking temperatures.
Q: Can I reverse sear a frozen steak?
A: Absolutely! The reverse sear is one of the best methods for cooking a steak from frozen. Simply add 15-20 minutes to the oven phase, monitoring the internal temperature until it’s 10-15°F below your target.
Q: Why is my sous vide steak tough?
A: This is rare, but it can happen with very lean cuts like filet mignon if they are cooked for too long (e.g., 4+ hours). The proteins can become overly firm. Stick to the 1-4 hour range for most steaks. Toughness in a cheaper cut usually means it needs more time, not less, to break down connective tissue.
Q: Which method is better for meal prep?
A: Sous vide has a distinct advantage. You can cook multiple steaks, quickly chill them in an ice bath, and refrigerate them in their bags for up to a week. For a quick meal, simply reheat the bag in the water bath for 30 minutes and then sear.
Conclusion: And the Winner Is…
For the home cook seeking the ultimate steakhouse-style experience—a crispy, flavorful crust and a satisfying, traditional texture—the reverse sear is the champion. Its minimal equipment requirements and straightforward process deliver phenomenal results.
For the precision-oriented cook who prioritizes guaranteed juiciness, perfect edge-to-edge doneness, and unparalleled tenderness, sous vide is the tool of choice. It’s also the undisputed winner for cooking tough cuts, meal prepping, and stress-free entertaining.
As we’ve explored, the science, the ideal steak cuts, and the detailed steps for each method are distinct. Ultimately, the best method is the one that fits your goals, your kitchen, and your palate. Trying both is the best way to discover your personal champion.
Ready to Master Your Chosen Method? Dive into our complete, step-by-step guides above for reverse sear and sous vide. We break down every detail for a perfect result every time.
Which method are you leaning towards? Do you have experience with both? Share your thoughts and questions in the comments below—we love discussing the science of great steak!
Some Important Videos and website address are as follows
First Video
Second Video
Third Video
- https://www.seriouseats.com/the-food-lab-complete-guide-to-reverse-searing
- https://www.americastestkitchen.com/articles/862-sous-vide-vs-reverse-sear
- https://www.chefsteps.com/sous-vide
- https://modernistcuisine.com/
- https://www.cooksillustrated.com/articles/1307-how-to-reverse-sear-steaks
- https://amazingribs.com/tested-recipes/beef-and-bison-recipes/reverse-sear-best-way-cook-steak/
- https://www.bonappetit.com/test-kitchen/article/sous-vide-steak
- https://anovaculinary.com/what-is-sous-vide/